10/28/13

Get Regular

This post is for mature audiences. However, even if you are a "millennial" (born between 1982 - 2002) you could benefit from this information, considering the sorry state of the average American diet.

At his most recent colonoscopy, my husband Rick was diagnosed with diverticulosis, a symptomless condition of the intestines which seems to be common in our aging baby boomer generation. The suggested lifestyle change for people with diverticulosis is to add more fiber to the diet. Untreated #diverticulosis can become the painful diverticulitis, so it is important to prevent the condition from worsening.

NOTE: The Harvard School of Public Health recommends that children and adults consume 14 grams of fiber for every 1,000 calories of food they eat each day. For an adult male between the ages of 19 and 30 who eats about 2,800 calories per day, that means 38 grams of fiber per day; for an adult female of the same age who eats about 1800 calories per day, that means 25 grams.

Anyway, the list of recommended foods for increasing #fiber in our diets which the doctor handed us didn't vary much from what we already eat, so that was a dead end. And our daily green smoothies also provide high amounts of fruit and vegetable fiber. But the doctor also recommended supplementing with "Konsyl", a #psyllium (pronounced "silly-um") soluble fiber powder. I liked the fact that he had suggested a natural product with no added sugar or artificial ingredients; psyllium is derived from the seeds of a plant called plantago ovate. Following the doctor's advice, we bought powdered psyllium at our local drug store. Since then I have been using a psyllium grown organically which seems to be ground a little finer too.

The instructions on the powdered psyllium said to mix 1 teaspoon with water or juice, one to three times per day… but it's a bit tough to swallow! I started thinking about how to make this fiber supplement more palatable. I had made a couple of candy truffle recipes, and I figured the powdered psyllium could be incorporated with nut butter, sweetener, cinnamon, and other good tasting ingredients, similar to the truffles. So I've created a recipe for a raw fiber bar, easy to make, which tastes like a piece of candy… and is delivering the daily recommended amount of psyllium fiber. My measurements were based on making an easy-to-eat daily portion of the fiber supplement, equivalent to 1 tablespoon (= 3 teaspoons) per day.

JUDY'S FIBER BARS
(makes 28)
My preferences for ingredients in red type in my recipes are further explained on the "ingredients" page


1 c psyllium powder
1 cup almond flour (or very finely ground almonds)
2/3 c nut butter (peanut butter, almond butter, etc.)
2 T carob powder* OR unsweetened cocoa powder
2 T honey
2 T coconut oil **
1 t ground cinnamon
1 t vanilla extract

Mix all ingredients in a food processor until completely blended and crumbly. Remove mixture and pat into a ball. Cut the ball in half. On waxed paper, form each half into a rectangle, about 2" x 6" x 3/4" thick. Make one cut lengthwise, then evenly space 6 cuts across the rectangle - this will create 14 pieces for each half of the dough. No need to break them apart; just scoring them will make it easy to break one off once they are refrigerated. Eat one piece every day, remembering to drink lots of fluids. It sort of sticks to your inner mouth and teeth, so remembering to drink is not usually a problem!

Refrigerate one of the 14-slice bars, and slide the other into a zip back and freeze until ready to use. Taking one daily, you now have approximately a one-month supply. This bar will help make you more regular, and could decrease the likelihood that you will develop painful diverticulitis. The recipe is #gluten-free also.


* I use #carob powder, which has a chocolate taste and no caffeine, but, more importantly, it is a source of soluable fiber and reputed to improve digestion, with other nutritional benefits.

** Coconut oil is solid when refrigerated, so it helps make the bars firm. I like the health benefits of coconut oil also. Olive oil can be substituted.

10/17/13

Mother Nature's Timing


All these tiny seeds from one poppy!
If you've been saving seeds from your own plants, you might have encountered the terminology "cold stratification." This is a process which mimics what Mother Nature does in the wild to control the timing of new seedlings. It is a necessary "pretreatment" for certain seeds (but not for all seeds), which will not germinate otherwise.

Cold stratification subjects the seeds to cold and moist conditions for one to three months (varies with species), either outdoors in the natural environment, or in similar conditions you create indoors. Without this exposure, the seeds will not germinate, so this requirement dictates the timing of next season's growth.

Take wildflowers as an example. If my wild poppies flower in May, I will leave the spent flower on the plant to create seedpods which ripen in late June. The pods bend over and dump hundreds of tiny seeds on the ground. If these seeds were to germinate right away, new young poppy plants would start growing right away and flower again in a month or two. But Mother Nature didn't intend these wild poppies to be flowering again in late summer. To prevent the dropped seeds from germinating immediately, cold stratification is required before wild poppy seeds will germinate. So they must be exposed to winter weather, sitting dormant in the soil before they can germinate and begin to grow the following year. So if I gather those seeds in June, store them in my 60°F basement in an envelope until next spring, they most likely will not germinate when I plant them.

For this reason, I commonly sow my wildflower seeds between September and December, directly on the soil where I want them to grow. I'm not fussy about this, since they'd normally just drop off the plant, so the most I might do is to rake the soil to roughen it, then throw the seeds out of my hand. This is how I scatter my collected wildflower seeds - poppies, black-eyed susan, oxtail daisies, blanket flower, larkspur, columbine, Mexican hat and others. This gives me a great crop of little seedlings in late winter, and they are strong little plants by the time the spring temperatures warm up.

But if you want to harvest and store seeds which require cold stratification - many seed catalogs and other online sources can identify the plants which require this for germination - and plant them early in the next season, you can artificially simulate nature's cold stratification process. Here's how:

Wild Columbine

1) Clean the seeds so no other plant materials (leaves, pods, etc.) are mixed with them

2) Place cleaned seeds in a zip bag with a paper towel or sterile vermiculite or sand, slightly dampened moistened but not so wet that mold will form. A little powdered fungicide can be added.

3) Store the zip bag in the refrigerator, preferably in the veggie/fruit compartment (temperatures from 34 to 41°F are recommended). Do not put in the freezer. Length of time in the fridge varies; do you research online or mimic your winter conditions.

4) Check seeds regularly for fungus or mold or early germination

Read more about cold stratification and about saving heirloom seeds.

10/14/13

Grow a Zinger of a Plant

One of my favorite new plants in the garden this summer has been a flowering shrub called "Roselle Hibiscus." Did you ever hear of Red Zinger Tea? Part of this plant forms the main ingredient of the tea, and gives it the distinct red color. Roselle's reputed health benefits - lower blood pressure, weight loss, lower cholesterol, improved hair health, and more - are important, and it is high in anti-oxidant bioflavonoids. I'm a tea drinker and was intrigued to learn I could grow this unique and beautiful plant in my own garden.

The idea to grow my own Roselle came from a lecture I attended on herbs for boosting the immune system by herbalist Juliet Blankespoor of the Chestnut School of Herbal Medicine. Southern Exposure Seed Exchange was my source for heirloom seeds for Thai Red Roselle Hibiscus (Hibiscus sabdariffa). This is a sub-tropical plant, native to India and Malaysia, so I suspect it will grow as an annual here in my Zone 7 gardens. The seed company noted that, of the many varieties they tested, the Thai Red Roselle was the only one which began flowering by mid summer at their location in Virginia. Growers south of me have called the plant "Florida Cranberry" because of the tart taste and ability to substitute for northern cranberries. The seed company advises to grow Roselle with conditions similar to growing a tomato plant. Since I didn't learn about Roselle until March, I didn't start my seedlings until April. Only 2 of about 10 seeds I planted germinated, but two plants have turned out to be plenty for me. I started the seedlings indoors in a pot, in my south facing window.

The Roselle Hibiscus plant grows best in full sun, and I transplanted my 4" seedlings outdoors well after the last frost, into my new front yard edible garden, about 5 feet apart. Don't fertilize heavily or you'll get lots of leaves and no flowers. A bushy shrub with red stems and green leaves grew rather quickly for me, with lots of branching. A bonus to me is that the citrus-tasting leaves are edible, so I've been harvested the tender new ones for my green smoothies. The leaves can be added to salads and can be air-dried for later use too. Lovely pale yellow 2" flowers, deep red at the center, began blooming around mid July. Sadly, each pretty bloom lasts just one day, like other members of the hibiscus family. Even the spent flower is pretty though, with petals of pale coral soon dropping off.

The pod which grows after the flower dies is dark red and shaped like a big teardrop. This is the plant part which gets harvested. A developing seed pod is encased in this pod, in the "calyxes" (aka "calyces"), which are bright red points formed from the "sepals" of the flower. When these calyxes grow about 1-1/4" tall and full - which happens within a week after the flowering stage - they are harvested by snapping them off by hand or clipping them off so as not to damage the plant stem if they don't release readily. As of early October (our annual average first frost here is Oct. 15), I have harvested about 150 calyxes. The lovely shrubs, with a few stems now reaching 5 feet tall, are still flowering aggressively, so if I cover them on our coldest nights I can extend the season. I plan to leave some of the calyxes unpicked so the heirloom seeds inside can mature on the plant and I can save them for planting next year, even if I have to cut off a stem and let it continue to mature and dry indoors.

Iced Roselle Red Zinger tea - yummy!
Harvesting frequently increases the continued production of flowers. Commercial growers have hollow tubes to remove the inner pod, but, for my small harvests, I simply tear off the dark red calyxes at the base where they join the seed pod. (The seed pods are discarded or saved to dry for the seeds.) These tart, fruity pieces can be used fresh, frozen, or dehydrated. I boiled about 6 calyxes in a pint of water, simmering for 10 minutes, to make a fruity red tea. They've gone fresh into my smoothies too. I'm air-drying most of my harvest, to make my own tea blend, and I've tried freezing some in zip bags. I intend to try chopping some fresh calyxes to try substituting for dried cranberries in a quick bread recipe, so I'll let you know how that works. The plant naturally contains pectin, so it is often used to make jam or jelly.

I've started saving the Roselle Hibiscus seeds to share with friends, so let me know if you want some. I expect to have a few to sell or trade at our local Farmers Market plant and seed swap, coming up on Friday, Oct. 18 2013. Try growing red zinger in your garden next season!

7/11/13

Top 10 Reasons to Grow Blueberries

Yesterday's harvest: ten cups of yummy berries!
If I could only grow one fruit, it would be blueberries. I love them! This is the first year since I planted blueberries on this land 8 years ago that I will harvest enough without augmenting with a visit to a u-pick farm. Yeah!

Why grow blueberries? Because they are...
  1. packed with nutrients
  2. naturally pest- and disease-resistant
  3. low maintenance
  4. attractive additions to a landscape in all seasons
  5. easy to harvest
  6. heat, cold, and drought tolerant
  7. delicious
  8. eaten raw or cooked
  9. easy to preserve (freeze, dehydrate, jam)
  10. naturally sweet
Blueberries are great in these lemon yellow squash muffins!

Choosing a variety
Blueberries come in 3 basic types: low bush, high bush, and rabbit eye. Within each type, varieties can be chosen for harvesting in early, middle, or late season. Wild blueberries grow in many parts of the country, and tend to be smaller berries than the nursery varieties - but still wonderful. Check with your local garden centers and research varieties online to see which are best suited for your area. 

Some varieties are self-pollinating, but a bigger yield and extended season comes from planting more than one variety. I have several varieties, for a total of 12 bushes. Originally, I had carefully diagrammed which variety was planted in each spot, to help me keep track. Unfortunately, while moving some of the bushes around I lost track of what some of them are. No harm done - I love them all! My selection here in Tennessee  - zone 7 - includes Misty (a Southern high bush), Tifblue Rabbiteye, Climax Rabbiteye, Bluecrop high bush, Powderblue (a Southern hybrid), Sunshine (another Southern high bush), and Ka-Bluey® (a Gurney's Seed & Nursery Company hybrid).

How to Plant
Blueberries favor a sunny location, in soil with a pH of 4.5 to 5.2. This is higher soil acidity than most places have naturally, so it's often necessary to alter the soil they are planted in. A soil test can tell you the natural acidity of your planting bed, and you can adjust the pH accordingly.
 
In my area, blueberries are best planted in fall or spring. When planting new blueberry bushes, dig a hole about 2-1/2 feet wide and 1 foot deep - blueberries are shallow-rooted. Amending my heavy clay soil was essential. A rule of thumb is to plant the bush at the height it was in its pot, filling the hole with a mix of peat moss (naturally acidic), bark mulch (for good drainage), and good organic soil, at a 1:1:1 ratio, along with a dose of powdered garden sulfur (more acidity). Keep separate blueberry bushes at least 5 feet apart. Since the roots are shallow, mulching with 2 to 4 inches of bark mulch or pine straw will help keep the plants evenly moist, protect the roots, and keep down weeds. It will decompose to add nutrients to the soil also, so mulch annually.

Caring for the Blueberry Bushes
I add a dose of garden sulfur to each blueberry bush as the growth starts in early spring. Fertilizers like organic Hollytone are high in acid, and good for use on blueberries once the plants are established. Blueberries are high nitrogen feeders, so a dose of cottonseed meal is also good. 

You might not need to prune for the first 2-3 years of growth. Pruning should be done in mid or late winter, depending on your location. Remove dead, diseased or damaged canes, as well as low, small fine twigs. Prune to open the center and allow light and good airflow - especially important in humid areas like mine. Prune canes which are older the 6 years, and other canes by about 1/3, to encourage branching. A healthy bush could continue to bear fruit for 20 years or more.
Flowering ajuga brings bees to the blueberry flowers too.


Increase pollination
I am convinced that my blueberries produce well because of the ground cover I have planted around them - not to mention the abundance of additional spring flowers in my gardens. The timing of the blueberry flowers, in April, coincides with the flowering of "ajuga" (aka bugleweed), a hardy low groundcover which sends up a purple-blue spike of flowers. The bees flock to the ajuga flowers and visit my blueberry bushes at the same time, so cross pollination occurs successfully.
The berries don't all ripen at the same time

Harvesting
Usually blueberries within one bunch don't all ripen at once; you have to pick and choose the darkest ones, being carefully not to damage the unripened berries. The ripest ones often look like they have a powdery coating, which wipes away to shiny deep blue. If they are still a little pink, they won't be so sweet. With early, middle, and late varieties, you can extend your harvesting over a period of many weeks. Mine began to ripen in mid June and I still have lots which need several more weeks to ripen. As with any plant, it's best not to harvest when the plants are wet from rain or irrigation, since diseases spread more easily in those conditions. I like to harvest blueberries on a dry morning, before the sun gets too hot. I picked 10 cups yesterday (not counting the ones I ate!) Of course, it's hard to resist munching on a handful anytime I'm working in the gardens.

How to freeze
It's recommended not to wash the blueberries before freezing. My preferred method is to lay a big towel out and dump the berries onto it, spreading them in a single layer. If you've picked them with stems attached, rolling them around on the towel will make the stems drop off. The towel will absorb any moisture on the berries too. Some people like to freeze them in a single layer on a flat tray or pan to keep them from sticking together, but I haven't found this necessary. I measure 2 cups of berries into a freezer pint zip bag, shake to move them into the bottom corners, squeeze the excess air out, and seal the bag. I try to maneuver the berries around in the bag to distribute them evenly, then I stack the bags in the freezer. If I want to use them in the future for baking, I usually don't thaw - just take from the freezer, rinse and add them to the dry ingredients in the recipe. Frozen blueberries are fabulous in smoothies too.

Other fruits and berries I have tried or still grow have much fussier requirements than blueberries. If you are just venturing into gardening, I highly recommend you include blueberries in your plans. They can even be grown in containers, so get yours growing soon!

6/26/13

Weighing In on Gluten-Free

My Pumpkin Cranberry Bread is great with gluten-free flour.

It's nearly one year since I made a major change in my diet and became gluten-free. I wasn't suffering from celiac disease or even suspecting that I had a gluten intolerance. My gluten-free friend Kathy was visiting, and showed me the swollen joints on her fingers, resulting after she ate something in her travels which she didn't suspect had gluten - french fries with a breading. I had never seen such a reaction. Soon after that, another friend recommended I read Wheat Belly, a best seller about why modern wheat is causing so many of us to develop gluten sensitivity. By the time I finished the book, I decided that even if only 1/4 of the negatives the author attributed to gluten were accurate, I would be healthier without it in my diet. Now I am ready to report the positive side effects I directly relate to being gluten-free which have motivated me to stay on this regimen forever.

First I should admit that I am blessed with incredible good health. Other than a cataract in one eye at the young age of 43 and in the other at age 58, I have little more than a few occasional aches and pains to complain about. Certainly, factors such as genetics, environment, regular exercise, high activity, low stress, good sleep habits, preventive medicine, active social life, good living environment, normal weight, and medical screenings (mammogram, colonoscopy, dermatology body check) are part of my overall well-being. Undoubtedly, spending 24/7 with my best friend, business partner, and husband of 37 years, Rick, has an enormous positive effect on my life too, as does happiness in general. I count my blessings.

As the "Welcome" section of this blog states, my lifestyle diet for over 20 years has vastly differed from the prevailing American diet. Around the early 90s, my mother was living with Lupus, and Rick had been found to have abundant Epstein-Barr antibodies. So I plunged into learning how to strengthen the immune system with lifestyle choices. I researched healthier ways of eating, and eliminated foods and ingredients with artificial ingredients/colorings/preservatives, and those which are processed, genetically modified, raised in toxic conditions, irradiated, and/or void of nutrients. I was learning to cook all over again, substituting alternatives for refined sugars, trimming the fat from our diets, and experimenting with previously unfamiliar ingredients and recipes. Over two decades, my "eat"  and "don't eat" lists are frequently refined; I avoid foods raised inhumanely and in unhealthy environments. I don't buy imports from certain other countries, such as seafood from China, Thailand, or Vietnam. I favor locally grown, organic, seasonal, and wild harvested foods. I organically grow, preserve, and cook an increasing percentage of my diet every year, and I enjoy the process of "cooking from scratch." I buy beef, eggs, honey, chicken, and goat cheese from local friends and farmers. I buy monthly from an organic food coop, helping stock my pantry with good ingredients. About 18 months ago Rick and I also began drinking a green smoothie in place of one meal 4 or 5 days a week, using fresh greens and flavorful culinary herbs from my own gardens plus a variety of fruits and berries. Last November we started doing a daily glass of organic apple cider vinegar and local honey (served hot or cold) - which I think helps stop painful "charlie horses" in my leg muscles, among other attributed benefits. I drink water, green tea or herbal tea, and not much else except an occasional glass of red wine. So my diet definitely is a major positive factor in my overall health.

So what has the gluten-free diet done for me? Here is a list of my personal health changes I directly attribute to eliminating gluten:

Who's that chunky baby with my Dad - heavens, it's me!
Weight Loss - I don't own scales, but I knew my body was changing within weeks of going gluten-free by the fit of my clothes. For years, my 5'3" carried ±125 lbs., after peaking in the 130s in my late 20s. On two different doctors' office scales (that kind with the weights which don't lie) in the past 3 months - fully clothed, with shoes on, and after eating lunch - my weight holds stable at 115. I was never skinny - my thunder thighs as a baby turned into to "chubby" sizing in pre-adolescence. I'm not trying to brag, but it's nice to be back to my high school graduation weight. I haven't eaten sugary dessert type foods much for many years, but, since so many are made with wheat flour, staying gluten-free also helps me resist temptation. Coffee ice cream and extra-dark chocolate are still on my short list of occasional indulgences!

Weight Shift - For years, I've been unsuccessful reducing my "tummy" with diet or exercise. I never had a pregnancy, so stretched muscles were not my excuse. As the book title "Wheat Belly" suggests, and the content describes, modern wheat causes body fat to be stored in the "belly". After going gluten-free, my belly flattened.

Skin Improvements - I'm fair skinned with skin cancers in both parents, so I try to avoid sun exposure and get full body skin exams. I had had an itchy rash along my neck-hairline for decades which the dermatologist didn't indicate was anything too serious, but it was irritating to me. Dandruff shampoos, cortisone creams, and other treatments failed; going gluten-free nearly miraculously reduced the rash right away. My skin overall has a better feel now too.

Fast Healing - From a deeply sliced finger which happened about 1 week into the gluten-free diet, to any other healing my body required over the past year, all indications are that my immune system is quickly reacting and providing rapid healing. Even cold symptoms rarely last more than 1 day.

Improved Digestion - My stomach no longer "churns" or "gurgles" when I lie in bed at night, and I very seldom have any gas in my digestion any more. My first colonoscopy three months ago revealed just one small polyp.

Check my numbers: early this year I had my annual GYN physical, included a fasting cholesterol and full blood profile. My HDL (good) cholesterol was the best in the 13 years I've been keeping track, at 74, and the ration of cholesterol/HDL, which should be less than 3.5, had dropped from 3.3 in 2004 to 2.59. My glucose was down from 85 a year earlier to 80. Incidentally, I don't take any prescription medications; daily I take a 81 mg aspirin, red yeast rice, fish oil, lutein, and other vitamin/mineral/herb supplements.

I won't lie - being gluten-free is sometimes challenging and has required me to educate myself. Since I don't suffer from the very serious intolerance of celiac disease, I don't have to be "pure" so I can make a few exceptions. I won't turn down an invitation to eat homemade pasta! My friend Ken, who first share Wheat Belly with me, is owner/chef at a lovely New Hampshire bed and breakfast. He was so thrilled with his results of going gluten-free that he decided to make his business gluten-free, giving those with any level of gluten intolerance a great lodging alternative. He has also been successful in making his menu gluten-free offerings so delicious that guests who don't care or might be turned off by "gluten-free" don't even notice. We design and administer his website, and I learned a great deal when I helped write copy for his gluten-free info page about the complex process of eliminating gluten, not only from the menu, but from the entire facility and preparation process. It's amazing what was involved; read about it here.

Quinoa flakes are one of my new grain discoveries.

I'm gluten free at home and I make careful choices when eating out. At lunch, I've discovered that many restaurants will accommodate my requests for their sandwich offerings to be served without the bread. At home, I've eliminated wheat, rye, and barley flours from my kitchen staples, in addition to other ingredients where gluten hides, such as:
  • soy sauce [I buy San-J wheat-free tamari]
  • salad dressings [I make my own]
  • ice cream [beware of flavors with add-ins like cookies]
  • beer [I don't like it anyway]
  • spice blends [I mix my own from individual spices]
Being gluten-free forced me to discover alternate grains, which are delicious additions and substitutions in my recipes and meals - like quinoa, buckwheat, millet, amaranth, and black rice. I truly haven't really missed yeast breads, and I've had fun experimenting with gluten-free flours in my old favorite baking recipes (like biscotti, gingerbread, quick breads). I've ground my own flours from gluten-free grains, beans, seeds, and nuts - even from coconut. I've tried many new recipes for homemade crackers, pizza dough, pie crust, English muffins, and other baked goods which are usually made from gluten ingredients, and I'll continue to share my favorites in this blog. My trials have not all been successful, but I'm gradually creating a big file of delicious gluten-free recipes.

Big food companies are quick to jump on a bandwagon, and "gluten-free" is a new buzz word. Processed food and drinks labelled gluten-free fill the supermarket shelves, but they are not necessarily healthy foods. As with any packaged, prepared foods, you have to watch the ingredients. Many gluten-free baked goods substitute starchy flours or add stuff you don't need to make them taste better. I'm still discovering some gluten-free products which give me the best results in my recipes; Bob's Red Mill is a great brand, and their GF All-Purpose flour is my favorite flour mix (Pamela's GF flour made everything I baked with it too chewy); Thai Kitchen Stir-Fry Rice Noodles work well in stir-fries as well as in my oriental cold salads. Tinkyada is another good gluten-free pasta maker. Of course, the list of foods which are naturally gluten-free is long (fruit, vegetables, dairy, eggs, meat, poultry, beans, etc.), so there's still plenty of great food to savor!

I don't fool myself with thinking that my diet will prevent me from ever getting a serious illness or disease. I've witnessed sickness and aging enough to know that my youthful wish for a long life has to be edited to a wish for a long healthy life. Unfortunately, we live in a very toxic world, where our air, water, soil, livestock, poultry, cleaning products, health & beauty aids, produce, and more are laden with poisons and chemicals. It's impossible to live a normal life and avoid such a list. I figure teh best I can do is to try to reduce my exposure to such things, while sharing my knowledge to help people, like you, become more aware, better educated, and able to make smarter choices to make your life healthier.

6/18/13

The Proof is in the Pudding


This pudding recipe is one of my favorite concoctions to make in a Vitamix. The basic recipe is for Mint Chocolate Chip pudding, but I've also come up with variations for turning it into ice cream, and for flavoring tips to change it into Mocha Pudding or Chocolate Mint Pudding and other delights. I'll never get tired of it!

The surprising main ingredient is avocado, but you'd never know it by tasting a spoonful of this rich, satisfying dessert. The avocado adds a creamy texture - of course, in addition to adding a boost of good nutrients. The avocado creates the green color to the basic recipe, or blends with chocolate in the recipe variations to make a rich cocoa cream.

If avocados are not in your diet, out of season, or too pricey for a splurge, see my substitution of tofu. Many other substitutions in the basic recipe are noted. The coconut oil is an ingredient you won't want to change however; it is liquid at temperatures above 75 degrees, but hardens below that temperature, so, when this pudding is refrigerated or frozen, the texture thickens partly because of the coconut oil. Besides, coconut oil is very beneficial and nutrient dense.

Mint Chocolate Chip Pudding

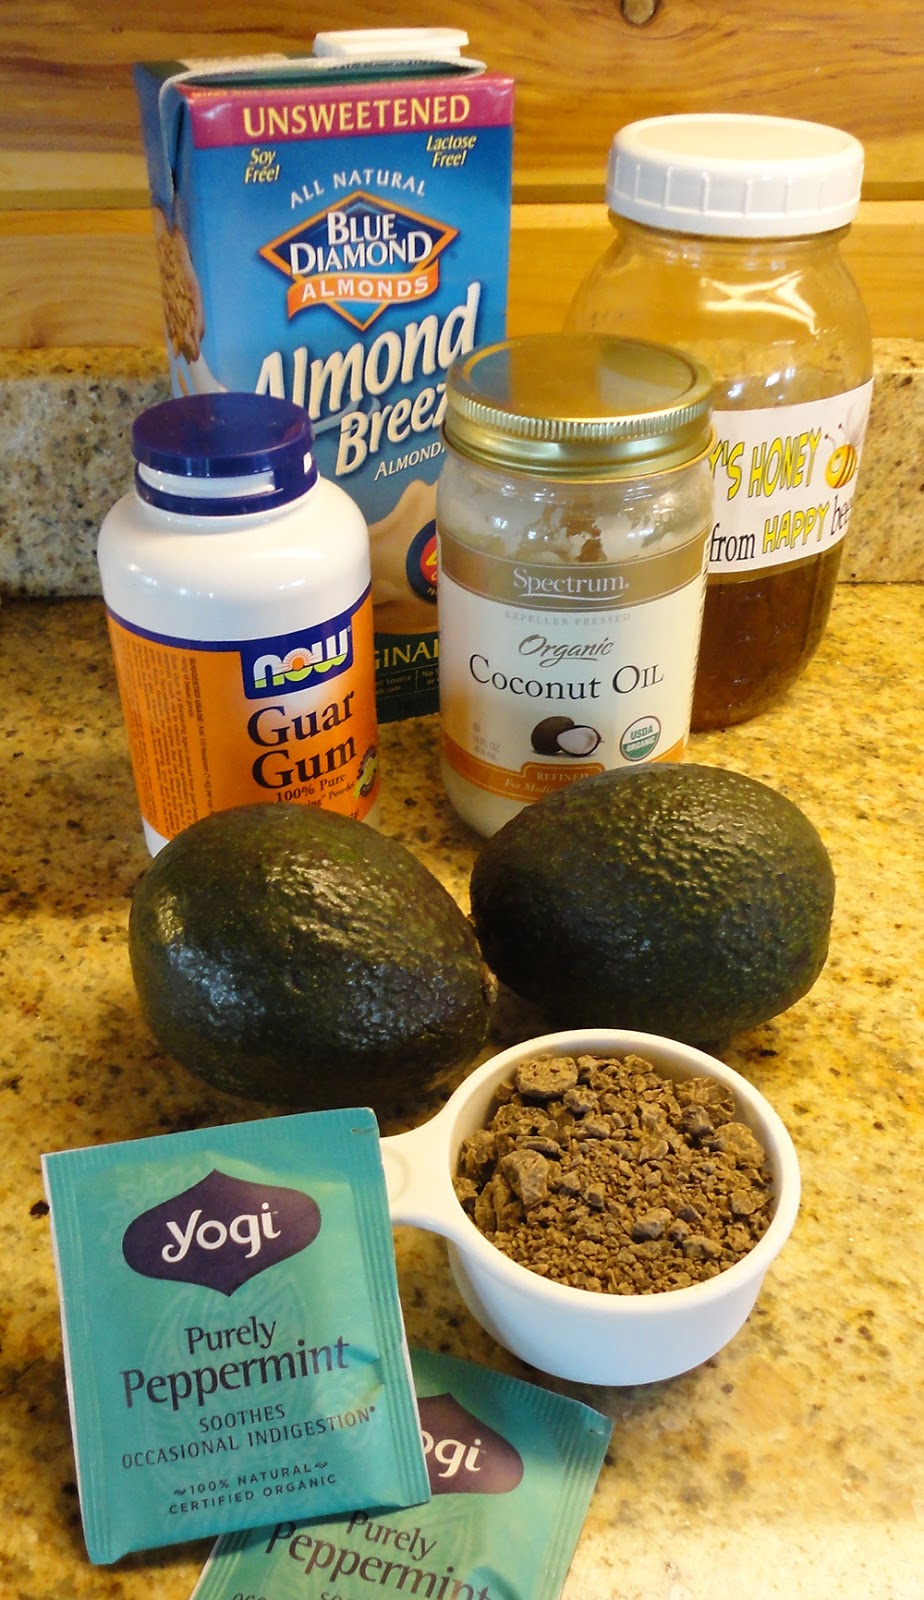
2 ripe avocados
1/2 c unsweetened almond milk
3 T honey
1 T coconut oil, warmed to liquid consistency so it mixes well
2 peppermint herbal tea bags
2 oz. dark chocolate bits (or broken pieces from a bar)

Remove the avocado skin and seed, and put the pulp into the Vitamix. Add everything else except the chocolate chunks into the Vitamix, tearing the tea bags to use the dried peppermint.


Run the Vitamix on 10 (the highest speed), mixing with the plunger tool, for 30-45 seconds, until a smooth green mixture forms. The mixture might get warm from the friction of blending, and this is the reason for not adding the chocolate chunks yet. (Actually, I made this mistake and it lead to the creation of some of the variations below.) Scrape the mixture out (this is the only hard part) and into a refrigerator container. When it has cooled, mix in the chocolate chunks. You can spoon the pudding into individual serving bowls to serve. If you are not ready to serve it right away, lay a piece of wax paper or plastic wrap over the surface or the avocado may oxidize and turn the top brown. You can alternately freeze the mixture and serve it as an ice cream, but I've found the timing a bit tricky… too long in the freezer and it's too hard. I'd suggest you try 30-45 minutes of freezing before serving.

VARIATIONS
Chocolate Pudding: Eliminate the peppermint. Add the chocolate chunks to the Vitamix with all the other ingredients.
Chocolate Raspberry: Eliminate the peppermint. Add the chocolate chunks to the Vitamix with all the other ingredients. After the pudding is spooned out, stir 1/2 cup of fresh or frozen raspberries into the pudding and continue to cool or freeze until ready to serve.
Mocha: Eliminate the peppermint. Add the chocolate chunks (or 2 T of unsweetened cocoa powder) plus 1 T of Roma or Cafix coffee-flavored grain powder to the Vitamix with all the other ingredients.
SUBSTITUTIONS
Mint: When I have fresh herbs from my garden, I eliminate the peppermint tea bags and use 1/4 c of fresh peppermint, spearmint, or chocolate mint leaves. Of course, you can substitute peppermint extract (try 1/2 t) for the dried or fresh mint leaves.
No avocados? Use 1 cup of organic firm tofu for the same creamy consistency. Use organic to insure the tofu is made from non-GMO soy.
Guar Gum:  This is a natural thickener and volume enhancer, sold as a powdery substance, made from a seed. If you don't have any, you might try using agar-agar flakes, arrowroot powder, or xanthan gum - but I haven't tested these other gelatin-like ingredients.
Chocolate: You can substitute 1/4 c of unsweetened cocoa powder for the chocolate chunks, and this can be added to the Vitamix with all the other ingredients. For a caffeine-free version, I usually use 1/4 c of unsweetened carob powder instead of the cocoa powder, so we can enjoy our pudding in the evening.
Almond Milk:  You can substitute unsweetened rice milk, coconut milk, organic soy milk, or nonfat organic cow's milk. You might even try fruit juice in place of all or some of the milk, like cherry or orange.

Other Flavors: 
Experiment with other flavorings… how about Chocolate Orange by adding orange juice in place of some of the milk, plus dried or fresh orange peel or orange extract? Or mix some chopped nuts into the chocolate variation. I plan to try the chocolate variation and adding some fresh cinnamon basil, anise hyssop, or lemon balm leaves from my garden. The possibilities are many - let me know your favorite!


6/13/13

Keep Birds From Stealing the Harvest

You can see the Flash Tape on my thornless blackberries
We love our songbirds, hummingbirds, wild turkeys, and other feathered friends - but not when they eat our berries!

This year I purchased "Bird Scare Flash Tape" when I ordered seeds from Southern Exposure. It is basically a shiny Christmas-type ribbon, 1/2" wide, red on one side, silver on the other. You twist it and wrap it around what you want to protect, and it looks like fire or sparks when the wind moves it, and scares the birds from landing there.

Last year I lost the whole crop of sour cherries from my little 5' Montmercery tree. When I saw the cherries begin to ripen a few weeks ago - and mockingbirds landing on  the branches - I ran out and wrapped the tape around it. Look at the fabulous bucket of ripe cherries I was rewarded with!

So far this tape has kept the birds from eating my blackberries also - next I'll be wrapping my blueberries, then my Concord grapes. If you are careful, you can remove it in one long piece and re-use it... I like to get my money's worth!


My friend Hal used a similar tactic to keep deer from eating his newly planted fruit trees. He bought a cheap used VCR, pulled out the dark tape, and wrapped it around the tree branches. So far, it is working to keep the deers from nibbling!
We enjoyed the cherry harvest this year, keeping the birds from eating them, as they did last year