8/26/11

Baked Vegetables Parmesan

With the abundance of fresh garden veggies this time of year, here is a great recipe for zucchini, yellow summer squash, eggplant, and even green tomatoes. It's gluten-free, low fat, and low carb - and delicious. The original recipe was for eggplant, given to me by my sister Jean, but I didn't want those of you who don't eat eggplant to bypass this recipe if I titled it "eggplant parmesan". I tried it with yellow summer squash and it was equally yummy. Give it a try!

1 eggplant OR zucchini or other firm fresh vegetable
4 egg whites *
4 T water
1/2 cup finely grated parmesan cheese
1 tsp garlic powder
pepper to taste

Use a shallow pan, lined with parchment paper and very lightly sprayed with cooking spray. Preheat oven to 400 degrees F.

If using eggplant, peel and cut into 1/4" rounds. If using summer squash, cut into rounds or, if it is very large and seedy in the center, cut 1/4" slices lengthwise around the center. If using green tomatoes, slice into rounds.

Beat egg whites and water in a flat bottomed dish, such as a pie plate. Mix parmesan cheese with garlic powder and pepper in a second pie plate. If your veggie pieces are small, you might put the cheese mixture into a plastic bag and shake the veggie slice to coat it. Dip your veggies, one slice at a time, into the egg then into the cheese mixture. Use more cheese if necessary. Place the slices in a single layer in the pan. When the pan is filled, lightly spray the tops with cooking spray. Bake for 10 minutes, then turn each piece over and bake for another 10 minutes, until golden brown. Serve with sauteed veggies as I did (all from the garden: carmelized onions, green beans, tomatoes, minced garlic, chopped basil, fennel seeds), and your meal is complete!

* Twice I have successfully substituted for the egg whites - one time I didn't have eggs, so I used the little can of powdered egg whites I keep on hand, and couldn't tell any difference in the results. When I took these photos, I used two whole eggs, since they were from my friend Susan's free range chickens and I didn't want to discard the yokes. You could also use premixed egg substitutes, but I feel the added ingredients (like coloring to make it yellow) are unnecessary.

8/16/11

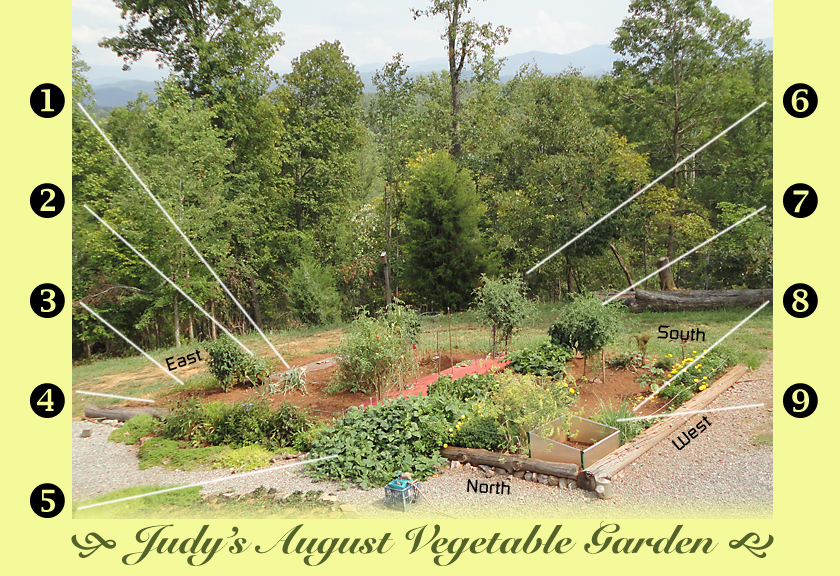
August in the Vegetable Garden


Several people in the last week have asked me if I am "winding down" my gardening season. No way! I'm harvesting continuously, growing late harvest plants, starting more seedlings, and getting ready for new crops when the weather cools. That's one of the pluses about living in Zone 7, with its long growing season.
  1. LEEKS - I just dug my first leek, to use in a stir fry later today. The stalk is about 1" diameter, and there is about 6" of white which is the part that grew below ground - not bad in our heavy clay soil. Don't think I'll grow these again, since I had to baby the seedling for a long period and many did not survive transplanting to the garden. Onions grow better for me.
  2. EGGPLANT - Both plants are producing fruit, but not so many that I am overwhelmed yet. Watch for my upcoming post of a recipe for Eggplant Parmesan - gluten free, low carbs - which is delicious.
  3. SWEET POTATOES - See the close up photos of how the grasshoppers keep defoliating the vines. I have been able to harvest some of the edible leaves  - which taste like mild spinach - when they grow back. Actually, it's a good system, since the new leaves are the most tender, vs. those that might grow on the vines for months.
  4. STRAWBERRIES - I thinned out the strawberry beds, discarding the overgrowth of babies. The main plants don't look very good, our hot weather causing dried brown leaves around the edges, but they are alive and show new growth in the centers. I had a great harvest this past spring from baby plants set out last fall, so I plan to do the same in any bare spots in the bed once our weather cools.
  5. THAI LONG BEANS - Pretty flowers, long vines and a long time for the beans to form. I hope to harvest a good crop very soon.
  6. TOMATOES - I removed the tomato plants most effected by blight and I keep pulling leaves from the lower stems of the remaining plants. So now I have several "topiary" tomato plants. But they are still producing a small crop, which I am happy to have. I've started a few late crop tomatoes again, since the first ones dried up and died in the heat.
  7. PEPPERS - The pointer is to my tall Chinese Giant sweet pepper plant, which, at long last, is producing little green peppers. Also, I took one of my strongest tomato cages and moved it as a support for the larger of my two jalapeno plants, since the branches were getting so heavy with ripening hot peppers. Green jalapenos are sold in markets, but I prefer to pick them when they turn red and black, sometimes with fine ivory veins on the skins.
  8. SQUASHES - I direct sowed seeds of various squash-family plants in July, and now I have a zucchini, 2 cantaloupes, 2 butternut squashes, 2 cucumbers and one casaba melon plant. I am keeping a close eye on them, and whenever I see the little brown egg clusters of the squash beetle I remove the leaf. I occasionally scatter [food grade] diatomaceous earth on the soil around these plants; it's an organic insecticide, an abrasive white powder made from fossilized remains of marine algae. Unfortunately, it washes away with watering and with rain. Every plant is flowering, and I am optimistic that the warm weather will continue so I can harvest these yummy veggies, since my earlier plantings succumbed to pests and disease.
  9. LEMON GRASS - I bought a little pot of Lemon Grass, a strong lemon flavored herb good in a stir fry or tea, and it's thriving in my garden. I am not sure if it will grow as a perennial in my zone; if so, I'll move it to the herb garden.
CELERY - I read of this trick online, and so far it is working: buy a celery stalk, cut about 2" above the bottom, and stick that end in about 1" of warm water for a few days. Soon, new greenery starts to grow from the center. At this point, I set the developing plant in my garden, mounding some soil around it and keeping it moist. It's continuing to grow taller, slowly. The instructions also recommended cutting the top and bottom from a liter bottle, pushing it into the soil around the plant. Otherwise, the stems fall over as they grow taller. Even if I only get celery green tops, it's a fun experiment.
BEANS - While I am waiting for the Long Beans to grow, another small bed of Bush Blue Lake green beans is about ready to harvest. I am giving up on yellow beans. Mine took a very long time to ripen, and the harvest is minimal. I don't think the flavor is as good as green beans either.

FALL GARDENING
After wasting lots of seeds by trying to germinate lettuce in the garden this summer, I learned from the internet that lettuce seeds have a thermal mechanism which tells them not to germinate at temperatures above 70 degrees F. Since our basement stays near 60 degrees year round, I started a big flat of baby romaine and black seeded simpson lettuces a few weeks ago. In two days, they had sprouted! Flats of kale and of brussels sprouts seeds, as well as two varieties of tomatoes, are growing well in the basement south-facing window. I'm also trying a new vegetable - celeriac. It is a big round root, a member of the celery family, very popular in Europe. It has celery flavor and can be stored like a potato. It is recommended as a fall crop, and takes weeks to germinate. So I started its very tiny seeds in a tray indoors also, and I've seen the first 3 seedlings emerge this week. Also, in preparation for fall planting, I have started "cold stratification" of some spinach seeds. This is done by putting the seeds in a small zipper bag with a tiny amount of water, then putting them in the freezer for about a week. Remove from the freezer for a day, then repeat. This method helps the germination of spinach seeds, as well as other seeds, by imitating the freezing and thawing of winter season.

8/3/11

Simple Air Dried Herbs

I like to make the most of the herbs I grow by drying them for year-round use. With the exception of cilantro and basil, which I think have their best flavor fresh, I use simple air-drying for my herb plants. Depending upon the type of plant, I dry leaves, stems, flowers, seeds and roots - mostly for culinary use and teas, but also some for ingredients in lotions and salves.

Examples of leafy herbs I dry are parsley, sage, rosemary, thyme (hey, sounds like a good song!), mint, lemon balm, lemon grass, chives, marjoram, stevia, holy basil, horsetail, and sassafras (called "filé" powder when dried and ground, an ingredient in southern gumbos). I dry the flowers of lavender, dandelion, and calendula. Seeds, which form after the flowers die, are pretty well dry by the time I gather them, and those I save include dill, fennel, coriander (the seeds of the cilantro plant), and nasturtium. Roots I harvest and dry include garlic, horseradish, bloodroot, echinacea, and - hopefully from this year's planting - licorice.

I primarily use four drying racks which slide in and out of a wood frame, a set-up I purchased a few years ago. I've never seen another like it, so I am sorry to say, I can't recommend where to buy a similar one. Each of the rack "drawers" is a rectangular wood frame lined with fine mesh screening. Air flow is essential for dehydration, and a single layer of herbs on the screen avoids mold or mildew forming. I set this up in my basement, which averages about 60 degrees in the summer. You can use old window screens or stretch a piece of screening bought at the hardware store over wood frames or artists' stretcher bars for a similar set-up.

Most guides recommend picking herbs for drying just after the morning dew has dried. If the herbs have large leaves, I strip them from the stems and lay in a single layer on the screening. For those with tiny leaves, like thyme, I keep the leaves on the stem until drying is complete, then just run my fingers down the stem and they drop off. For long leaves like chives and lemon grass, I cut the freshly picked leaves with scissors, into pieces 1/4-1/2" long. Flowers dry best when newly opened. If they are large or bulky, I dry them on the top drawer of my racks, which is open (see photo). For drying roots, which often hold a lot of moisture, I slice fresh, cleaned roots into smaller pieces, exposing more surfaces to the air to expedite drying.

Drying time is influenced by the type of herb, the type of drying rack, the amount of air circulation, and the ambient temperature. Most of those I dry are dehydrated in a few days.

To preserve the flavor of the dried herbs, store in a tightly covered jar, away from heat or light. I save the desiccant packets from vitamins and supplements and drop one in the jar with the dried herbs, just in case any moisture is released. If I have more of a dried herb than I'll use in 6 months, I often use the hose attachment of my FoodSaver and vacuum seal the herbs for longer-term storage in canning jars.

Herbs are relatively easy to grow - they don't demand picking all at once when "ripe", as most vegetables do, grow in pots as well as in the ground, don't require large gardens, and they aren't too fussy about soil requirements. Most prefer full sun. Perennial herbs come back yearly and grow into larger patches (beware of mints, they can take over); annuals such as basil or dill can be left to self-seed and the plants will return the following year. Some herbs are seasonal - I've found, to my dismay, that cilantro grows best for me in the winter months; basil demands warm weather.
Plant a pot of herbs, tuck some among your flowers, or dedicate an area to an herb garden, and enjoy the bounty!

7/21/11

July in the Vegetable Garden

July has brought successes and failures in my veggie garden. The sun is strong, the temperature is very hot and the humidity is high, so I try to be out early when I need to do some garden work. Rain has been fairly regular, most often in heavy downpours. Despite all this, I've been eating, freezing, canning, and dehydrating my harvests, and the vegetable garden is free of weeds and looking good. (Can't say the same about some of my flower gardens, unfortunately!) Here are the details:
  1. SWEET POTATOES - My plants are still surviving attacks by leaf-eaters - probably grasshoppers, as reported early. Leaves grow back, pests come again, and the cycle repeats. I don't think this is harming the development of the sweet potatoes themselves, since the abundant green leaves can be harvested and cooked like spinach.
  2. EGGPLANTS - I took off the protective covers, and the leaves looked better than if I hadn't protected them, although some flea damage is still evident. Purple flowers have now formed into glossy eggplants and I picked the first one today. Anxious to try a new eggplant parmesan recipe from my sister Jean tonight!
  3. LEEKS - Growing well, while being fully ignored.
  4. BEANS - I harvested loads of delicious Blue Lake Bush green beans, and pulled up all the plants last week. The yellow beans, planted as seeds at the same time, are only just flowering now, but the plants are healthy. Overflowing the north side of the garden is a bed of Thai Suranaree "Long Beans", now in the flower stage. They were described in the catalog as "bush" but seem to be growing in long vines, so I am letting them trail. My beans need constant attention this year, to keep away whatever eats little holes in the leaves and beans. I spray with Garlic Barrier and keep scattering marigold petals over the beds. So far, so good. I froze 12 bags of green beans and I've started another small crop which will be great to eat fresh next month.
  5. FENNEL - I over-wintered fennel plants and now I have a huge flourish of flower heads, which I am letting mature so I can gather the licorice-flavored seeds. I'll have enough to supply an Italian sausage factory! The seeds are good for digestion.
  6. TOMATOES - I am now deep in battle with tomato blight, spread by a fungus in the soil. All the organic measures I have employeed to avoid it have only delayed the inevitable. I've already removed two of the plants, and three more are fighting blight. I've got some cherry tomato plants growing from my friend Sherry's seedlings, and they are healthier so far. I picked 13 beautiful half-pound tomatoes today, and in the last month I have harvested enough tomatoes to make lots of salsa (fresh, frozen, and canned) and salads, as well as eating them warm from the garden, like biting an apple. I plan to spoon a homemade bruschetta over the eggplant for dinner this evening. The white line points to a row where I've covered the soil with a garden weed-barrier cloth and transplanted 3 new tomato seedlings, so I hope to get a late crop, and I wish it to be blight-free!
  7. CUCUMBER - One cucumber plant succumbed to "wilt" which is spread by the cucumber beetle, a bug about 1/4" long with yellow and black stripes or dots. You'll see the leaves begin to wilt, one by one (see photo to the right). I delayed the damage by cutting off the bad leaves, but eventually it killed the plant. My other cuc plant, a different variety, is doing ok in comparison. I've planted seeds to start another plant.
  8. PEPPERS - In the collage of photos above, you can see the jalapeno plant which has been in the red Kozy Koat since I planted it last spring... it loves the heat and is loaded with peppers, with the plant growing tall above the red jacket. I've also picked a couple of sweet pimento peppers, but the sweet "Chinese Giant" variety (the tall one I've pointed to in the photo of the whole garden) hasn't formed any peppers yet. Funny thing, a friend to whom I gave one of these seedlings reports picking peppers already.
  9. MELONS & SQUASHES - I've started my late crop of cantaloupe - one here where I removed a tomato plant - as well as casaba melon and zucchini, next to the cold frame. I've put in 2 butternut squash plants also. I am hoping these late plantings are beyond the season for squash bugs, and our growing season is long, so I should have plenty of time for the fruits to mature.
In other growing news, I continue to plant successive rows of carrots, which I really like because they are content waiting underground until I decide to harvest a few for fresh eating - unlike other crops which need immediate picking when ripe. I'm still digging up beets, as needed, and some I had over-wintered are sending up flower stalks. I transplanted a few beets which I dug that were tiny, and some have re-rooted for a late harvest. Onions seedlings I planted last month are providing me with scallions while the bulbs form and grow. The Little Gem Lettuce started sending up flower stalks, as the leaves became too bitter to use. I'm letting it go to seed, since it's the only lettuce in the garden now; the seeds will not have been crosspollinated with another variety, so I can save them for future plantings. I've not been successful starting lettuce lately, even varieties described as heat tolerant. I even resorted to buying romaine last week, to have a big salad with all the other garden goodies. The flat leaf and curly parsley, as well as the Thai basil, are big bushy plants now, which do best with frequent harvesting by cutting off the plant tops. I picked enough parsley to dry some last week.

I found loads of ripe grapes on my two concord grapevines last week, and devoured a few handfuls. When I anxiously went to harvest a bucketful today I discovered some critter wiped out the entire crop (raccoon? deer?). I was so disappointed, after my careful pruning last February, fighting off a wormy thing in the spring, and saving the vines from Japanese beetles recently. I'll need to correct my timing next year. My garden education continues, and I hope you learn something from my experiences!


7/18/11

The Numbers Are In…

As you know from my writings, I am a big proponent of a good nutrition as part of a healthy lifestyle. One reason why I share my recipes, my choices of ingredients, and info on growing organic food is to help others. Certainly genetics are a factor in our health; reducing stress is important, and making time for laughter, good friends, and fun activities has positive effects. But I lean heavily in favor of a healthy diet and regular exercise. Is it ok to eat a bowl of ice cream or side of fried onion rings once in a while? Of course! But by maintaining a basis of every-day good eating, you'll most likely never need to "diet."

I just got results from a medical checkup, and I am pleased to be able to brag. I don't take any prescription meds, and, at age 56, my weight is about the same as it was 30 years ago, my blood sugar is 85, my total cholesterol is 184, my LDL (bad) cholesterol is 102, and my blood pressure is 100/70.

So thanks for following this blog and I hope the information helps you maintain or start a healthier life!

7/12/11

Therapeutic Elderberry Syrup

My friend Josie is picking fresh elderberries this week, so I thought it would be timely to post this recipe. Black elderberry (Sambucus nigra) is a natural remedy with high levels of antioxidants for building a healthy immune system, and with proven antiviral properties for treating strains of influenza viruses. A traditional remedy for fever, colds and colic, black elderberries grow wild here in the Southeast and can be cultivated. You can purchase ready-made elderberry syrups and tablets, but I prefer to make my own, adding other natural ingredients which make it even more soothing and tasty. If you don't have access to fresh elderberries, dried berries are sold in some health food stores or online from companies such as Mountain Rose Herbs.

Very soothing and therapeutic for coughs and sore throats due to viruses such as the flu, this syrup has no pharmaceutical ingredients and doesn't cause drowsiness.
  • 1 c fresh OR 1/2 c dried elderberries
  • 3 c water
  • 1 cinnamon stick
  • 3 cloves
  • 1/2 in piece of peeled fresh ginger root
  • 1 c honey
Combine all ingredients, except the honey, in a saucepan and bring to a boil. Simmer 30 minutes. Smash the berries, strain the mixture. Cool. Stir in the honey. Stores 2-3 months in the refrigerator. Use as needed, by the teaspoon.

This is so tasty and healthful, there is not reason why you couldn't enjoy this syrup even if you don't feel ill! Thicken the initial mixture with a dilution of cornstarch or arrowroot powder and use it mixed into plain yogurt.

7/7/11

Tabouli, Fresh from the Garden


I love to make this salad / appetizer when the tomatoes, scallions, and herbs are fresh from my garden. Tabouli (aka tabbouli, tabouleh, tabbouleh) is a traditional Middle Eastern salad. Bulgur is a quick-cooking version of whole wheat kernels which have been soaked, boiled, dried, and cracked after the bran is removed. For a whole grain variation, I sometime use 2-1/2 cups of cooked quinoa in place of the bulgur.
  • 1 c bulgur wheat
  • 1 t salt
  • 1-1/4 c boiling water
Mix the bulgur and salt in a heat-proof bowl. Pour the boiling water on top and stir. Cover loosely with a towel and let stand for 30 minutes. Drain if necessary.
  • 1 c chopped parsley, packed
  • 1/2 c chopped scallions
  • 2 T chopped fresh mint
  • 1 c peeled tomato
  • 1/4 c olive oil
  • 1/4 c fresh lemon juice
  • salt & pepper to taste 
Mix the above ingredients with the bulgur and chill until serving time. Traditionally served with pita bread, and Scoops work well too.